The electricians came on Monday to install our solar panels and inverter. It took them a good 5-6 hours, but by mid-afternoon (a sunny one), we had them all installed and I got to watch as our analog electric meter ran backwards!!! So awesome! Unfortunately, we had to turn it all off almost as soon as it was up and running, as we still need a variety of inspections to take place. Once they pass, the the electric company (Pacific Power) will come and install a new digital meter and hook us up to the grid. With the weather we've been having, I hope we can be producing electricity very soon. We're hoping by next week. Living in Eastern Oregon, I am told that the electric company only has a half dozen or so reps on this side of the state, so it could be even longer. It all depends on their schedule. I'm hoping to get a call soon for the inspections. We've been warned that this is one of the toughest parts of the whole process... knowing that you're able to power your house with solar but being unable to until it gets all signed off.
If any one's interested, I'll step you through a lay person's perspective of how it all happened. As mentioned before, we first had the roofers come and install the support system. Monday the crew unpacked the solar panels, hoisted them on top of the roof installed them to the rack and hooked all the wires together.
They then crawled inside our attic and ran all the wires through the roof to a wall in our garage, next to the circuit breaker. They installed 2 new circuits in the breaker box, and also put in an inverter and an independent meter that tells us just how much electricity the panels produce over their lifetime. The inverter converts the direct electric current (DC) that the solar panels produce to the alternating current that the grid uses (AC) It also has a screen that tells us a lot of various statistics. Here's a "before and after" picture.
The new digital meter that Pacific Power will install will be able to calculate our usage and the amount of power we generate. Any excess will be used to power our neighbors houses and the excess will be credited to our account. Unfortunately they don't have a "buy back" program, so we won't be making any money, but we'll save money, since our bills will be lower. And yes, we'll have to save over more than a few years to pay off the cost of the array too. For that reason, as well as financial and spacial concerns, we kept the array smaller than what we'd need to fully power our house. Since we're hooked up to the grid we also don't have to use batteries too. If the power goes out on the grid, our panels get shut off as well, due to safety concerns for the line workers. So it's a bit different than a stand-alone solar array, but that's not a bad thing.
I'll be sure to let you know when we start soaking up the sun!!
Wednesday, September 29, 2010
Monday, September 27, 2010
If at first you don't succeed...
I'm trying.... AGAIN!
I'm about to enter the 4th quarter contest for "All People Quilt". I had a lot of fun with the last challenge, did much better than I thought I would, and decided to give it another go!
The challenge this time was to create a pillow with a appliqued flower on the front, edge trim and little rosettes in the center.
At least I think that's the challenge. For a creativity contest, the pattern this time seemed a bit constrained. I'm still pretty new to the whole contest world, so decided to throw caution to the wind and use a little creative liberty. Also, win or lose the contest, this pillow is mine, and I wanted to create something that I'll actually use. But that leads me to another issue that I have with this project... Ever since we got our pup, throw pillows have become pretty scarce in our house.
Add 2 boys to the mix, and... well, you get the picture. I'm not sure I'll even be able to use this pillow in our home decor, but it was a lot of fun to make!
My flower is the "fleur de lis". It's probably the most ubiquitous symbol of Louisiana, and after Hurricane Katrina, it has become a prominent symbol of hope. I used the Mardi Gras colors of gold, green and purple. I had some of the coin trim laying around that I got from Wal-mart when they closed their local fabric department last winter (75% off). It reminds me of the doubloons they throw from the Mardi Gras parades. It was a bear to sew on. I ended up using a "reverse blanket stitch" from my machine to sew it without breaking too many needles on the beads above the coins. The math involved with the diamond pattern also stumped me! Anyone know how wide of a fabric strip to cut to get a certain diagonal length 30 / 60 degree diamond? I'll figure it out one day. In the end, I just winged it, and it turned out fine.
Originally I was going to applique a black boarder completely around the gold fleur de lis, ala "Saints" Football team, but after looking at some "3-dimensional quilt patterns, and talking to my 12 year old son, came up with the idea of a shadow effect instead. Who knew my 12 year old son would be such a creative quilting genius! He has zero interest in sewing, but has been my biggest fan when it comes to this contest. What an amazing thing it is when the kid I've encouraged and rooted for all these years suddenly starts doing the same for me!
One last thing I learned, concerns shopping for fat quarters. I originally was going to use this green fabric, I bought at a quilt show in Walla Walla, Wa (love saying that!). It's about an hour away from where I live. When I got home and opened it up with the others, I was horrified to see that it was 2 different colors. I guess I'll be checking this more carefully in the future. Luckily the local quilt store had a green batik that I could substitute.
Wish me luck!!!
I'm about to enter the 4th quarter contest for "All People Quilt". I had a lot of fun with the last challenge, did much better than I thought I would, and decided to give it another go!
The challenge this time was to create a pillow with a appliqued flower on the front, edge trim and little rosettes in the center.
At least I think that's the challenge. For a creativity contest, the pattern this time seemed a bit constrained. I'm still pretty new to the whole contest world, so decided to throw caution to the wind and use a little creative liberty. Also, win or lose the contest, this pillow is mine, and I wanted to create something that I'll actually use. But that leads me to another issue that I have with this project... Ever since we got our pup, throw pillows have become pretty scarce in our house.
Add 2 boys to the mix, and... well, you get the picture. I'm not sure I'll even be able to use this pillow in our home decor, but it was a lot of fun to make!
My flower is the "fleur de lis". It's probably the most ubiquitous symbol of Louisiana, and after Hurricane Katrina, it has become a prominent symbol of hope. I used the Mardi Gras colors of gold, green and purple. I had some of the coin trim laying around that I got from Wal-mart when they closed their local fabric department last winter (75% off). It reminds me of the doubloons they throw from the Mardi Gras parades. It was a bear to sew on. I ended up using a "reverse blanket stitch" from my machine to sew it without breaking too many needles on the beads above the coins. The math involved with the diamond pattern also stumped me! Anyone know how wide of a fabric strip to cut to get a certain diagonal length 30 / 60 degree diamond? I'll figure it out one day. In the end, I just winged it, and it turned out fine.
Originally I was going to applique a black boarder completely around the gold fleur de lis, ala "Saints" Football team, but after looking at some "3-dimensional quilt patterns, and talking to my 12 year old son, came up with the idea of a shadow effect instead. Who knew my 12 year old son would be such a creative quilting genius! He has zero interest in sewing, but has been my biggest fan when it comes to this contest. What an amazing thing it is when the kid I've encouraged and rooted for all these years suddenly starts doing the same for me!
One last thing I learned, concerns shopping for fat quarters. I originally was going to use this green fabric, I bought at a quilt show in Walla Walla, Wa (love saying that!). It's about an hour away from where I live. When I got home and opened it up with the others, I was horrified to see that it was 2 different colors. I guess I'll be checking this more carefully in the future. Luckily the local quilt store had a green batik that I could substitute.
Wish me luck!!!
Thursday, September 23, 2010
Fried okra
Anyone who knows me well, knows that I LOVE fried okra. It's my favorite vegetable. I probably could eat it every day. Unfortunately, living in Oregon, I rarely get to eat this treat. This year, though, we were able to grow some in our garden. Okra likes really hot weather and a long growing season. That's probably the main reason you don't find it outside of the South. But I have had some success growing it, both in Southern Oregon, and now in the Pendleton area. It doesn't get huge, and now that the nights here have gotten cool the production has screeched to a halt, but I grew enough with 20-ish plants to serve it maybe 4-5 times as a side dish for our family of 4. I hope to plant even more next year. I did spot some at a local growers market recently, but sadly, it was all way too big and tough. But I'm encouraged to see it. I have yet to see it in any grocery store here, but would on rare occasion see it in Southern Oregon when we lived there. If you're lucky enough to have it in your grocery store or farmer's market, give this recipe a try. These pictures are from what will probably be out last batch this year from our garden :-(.
First of all, you need to select fresh green small pods of okra, as pictured above. Okra is pretty fragile and bruises and browns (and molds) easily. It'll keep up to a week or so refrigerated if fresh. I start by slicing off the stem caps.
I grew up using a paring knife to slice the okra into rounds of about a 1/4 inch, but discovered that using a mandoline slicer makes the job quicker, easier and more uniform. I bought mine for under $20.
Once all the okra has been sliced, I "bread" it with equal parts flour and cornmeal. My mom used to put it all into a paper bag and shake it. I just add it to the bowl and give it a stir. Okra is naturally very sticky, so there's no need to add any eggs or milk to make it stick! I also add a small amount of salt, but you can add this once it's cooking to taste.
Next, I heat up about 1-2 tablespoons of vegetable oil in the skillet. My grandma used to use bacon fat that made it SO good, but I prefer to use canola oil. Over medium heat, fry or saute the okra until it's tender and medium brown. I usually stir it frequently to keep it from burning... every minute or so, and it typically takes me about 15-20 minutes. My kids have learned (from me) the tradition of nibbling the okra as it cooks, so I always make extra for nibbling.
Some people like Tabasco on the okra after it's served, others, a little pepper. I just like it with a little salt, and we all fight over who gets the last bit from the pan, because all the fried breading crumbs that fall off are also yummy! Enjoy!
Wednesday, September 22, 2010
Finally! Solar installation starts!
We've been eagerly waiting a few long, sunny, months for this news! We got the call this week from "Livelight" (our contractor), telling us that our solar "kit" was finally in and ready for installation.
Part of Solarize Pendleton (and many other "solarize" programs) is that we all work with a single contractor to get the best cost savings. One problem with this is that if you're not first in line, you wait... and wait... and wait... But it looks like our waiting is almost over! Today the roofers came and installed the mounts and rails that the solar panels will be mounted on. It took 2 men about 3-4 hours to do it. With a new house like ours, with engineered roof trusses, it was pretty straightforward, so we were told. We feel lucky this way. I guess some older, and more custom houses have had a harder time mounting the "bases". Monday the electrician comes with the panels and inverters and such, then it's inspections and finally the electric company will hook us up to the grid. This is what our house looks like today:
We've watched a few other solar installations going up in our neighborhood and are excited to soon be joining them. Despite the long wait, which was also partially due to manufacturing delays and very high demand, we're still glad we went with the "solarize" program, and can't wait to show you the end result!!
Tuesday, September 21, 2010
Childhood Obesity
Michelle Obama has got me thinking about childhood obesity. Michelle Obama's campaign, "Let's Move" is her action plan for reducing childhood obesity. As a former health care worker, I saw daily the first-hand effects of the growing obesity problem. Diabetes, high blood pressure and cardiovascular disease are all side effects of this preventable condition.
Members of my own family, as is true with SO many American families, have struggled with obesity. I often wonder if it contributed to the sudden early death of my own father. As a mother I want my children to be healthy, both mentally and physically.
Being raised in the south, the very fibers of my being cry out against bringing up such a taboo subject. After all, it's not exactly good manners. I'll also be the first to admit that I'm not very knowledgeable on the subject. But I am a mom, and a daughter who lost her father much too early in life. This is what compels me to breech the subject. Each day I see signs of the childhood obesity epidemic when I drop off and pick up my son from school. I think Michelle Obama's most important contribution is to get all of us talking about obesity, and bringing the subject out in the open.
I don't want to even speculate what has led up to this. There is so much good information on the "Let's Move" website. Basically it comes down to eating better and moving more. I thought I'd share a few things that have helped our family eat better over the years.
First, we've (almost) always had a garden. I LOVE LOVE LOVE that there's now a garden at the White House. I can't think of any better way to get kids to eat their vegetables. When they actively help plant and nurture their food, you can guarantee they're going to eat it!
Another thing I've always done is to freeze fruit for their snacks. I know we really shouldn't be giving our kids so many snacks. But I do know that we should be eating more fruits and vegetables. By buying fruit at our farmer's market in bulk, then cutting and freezing it up, I not only have fruit to make into breakfast smoothies, or to use as snacks, but I also help the environment (less food miles, and using what's in season) and our local farmers. It's easy, saves money, and when the kids do get hungry for a snack, they can reach into the freezer for a frozen healthy treat. I find that spreading the bite-sized fruit onto a single layer then freezing it before packaging it makes it easier to use. If you don't have time to do it yourself, the grocery store has lots of frozen fruit to buy and eat at home.
The last thing I'll mention is Penzeys Spice Company. They make cooking at home a pleasure! Home-cooked meals are not only healthier, but cheaper. Cooking at home also allows you to get your kids involved and teaches them this very important life skill (one that schools rarely teach). What Penzeys delivers is an incredible assortment of spice blends that makes it so easy and delicious to make almost anything at home.... pizza, Cajun food, Indian food, curries, salad dressings, soup, baked goods, barbecue, the list goes on. They have excellent customer service, and if you're lucky, you may live close to one of their retail stores. They have made my job as home cook so much easier!!! (Special thanks to my friend Jen for introducing us many years ago).
Finally I'd like to encourage anyone who reads this blog to open a dialog as well about childhood obesity. Let's move!
Monday, September 20, 2010
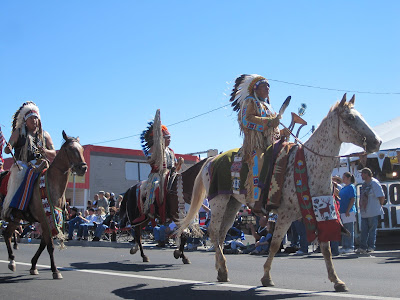
More Round-Up pictures....
Round-Up is now officially over, but I thought I'd share a few pictures of the actual rodeo that we went to on Thursday, and the "Westward Ho" Parade on Friday. Thursday was "Tough Enough to Wear Pink" day, in support of breast cancer, and the Westward Ho Parade is an all non-motorized parade. We all really enjoyed our first Round-Up!
Wednesday, September 15, 2010
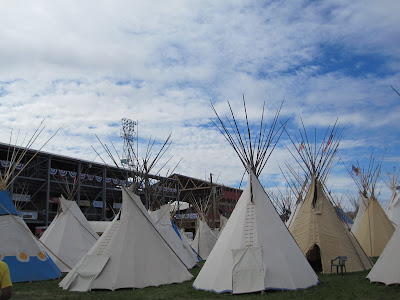
Pendleton Round-Up 2010
This year is the centennial of the Pendleton Round-Up Rodeo. It's our first September here in Pendleton, and like-wise, our first Round-Up, so I don't have a lot to say, but thought I'd share some pictures both of the "Dress-up Parade" that kicks off each year's week-long festivities, and some pictures I took last night on Main Street. Enjoy!
Friday, September 10, 2010
Finished!!
I'm on a roll ("Let 'er roll!")! After finishing my last top, I finally drug out the quilt that's mostly been sitting on top of our piano since Spring. I pieced it last winter, and did all of the quilting myself, free-motion, after taking my class in late winter / early spring. The binding got cut, sewn together and ironed before the kids got out of school, but then... well, the kids got out of school.
Now that they're back, I finally got the binding sewn on! First though I had to get all the cat hair off of it. I don't know what it is about any type of fabric and cats, but mine finds it utterly irresistible to nap on top of any extra item of clothing or fabric laying around, including my almost-finished quilt. It was also on a piece of furniture that had an excellent view of the dining room, living room, and yard, AND it was out of reach from the dog! Put a soft quilt on top, and it was her spot, 23.5 / 7.
After getting all the hair and dust off, I put on my walking foot and started sewing the binding on. When I first started quilting, I'd never heard of a walking foot, or long-arm quilters who, for a price, do the quilting for you. After getting really exasperated with my first quilt, I went to the local sew and vac shop and explained my problems with tension, nests of thread on the back and just a general lack of ability for my machine to sew through 2 layers of fabric and a layer of batting. They sold me this walking foot, much to my delight!
A co-worker and fellow quilter told me about long arm quilters when I asked her how to do a queen-sized quilt on my home machine. This was a quilt I made for my parents, after they returned to New Orleans after Hurricane Katrina. I just slept under it myself a few weeks ago when visiting my mom in Dallas.
After quitting my job to stay at home with the kids, and moving to Michigan, I suddenly couldn't afford to pay someone else to quilt it for me, and my friend Lois Gorton at Pine Tree Quilt Shop in Lewiston, Michigan sold me a darning foot and gave me a few pointers to get started.
But it wasn't until recently that I took a class from Collen Blackwood, and started reading Leah Day's blog, 365 day of free-style quilting that I got the confidence to tackle something bigger than a baby quilt or a place mat. I must admit that I feel like a klutz, but also realize that just like anything else, it's going to take some serious practice to get good at it. I'm also trying really hard not to get intimidated by the beautiful quilts that I see in quilt shows and shops.
Because I have felt discouraged from time to time when my hands and machine won't do what I want them to do, I thought I'd show my beginning projects in free-motion. Maybe some other free-motion novice will see this and feel a bit better! All in all though, I'm pretty proud and excited about this first big project. The pattern is "BQ" by Maple Island Quilt Patterns. It was perfect for showing off some of the Oriental fabric that I had in my stash.The kids have the next week off for the Pendleton Round Up Rodeo. This is the 100th anniversary of one of the largest rodeos in the country. Let 'er buck! It may be a week or more before I get another project finished!
Wednesday, September 8, 2010
Pathway to the Stars
Now that the kids are back in school, I've had a bit more time to sew! More importantly, I've been able to clean and it STAYS clean, at least for a few hours until the kids get home! Since my "quilt studio" is also our dining room table, that's really important. I can wipe up the sticky watermelon juice and odd bit of breakfast cereal that some how escaped the bowl, and it stays clean enough to sew on without being concerned that the fabric gets dirty.
I took a class back in June from Colleen Blackwood called "Pathway to the Stars". With the kids now back in school, I've been able to pull it out again. I finally got it to an "almost-finished-with-the-top" phase, and wanted to share! It's my 2nd class with Colleen (I also took a free-motion quilting class). Actually, it's only my 2nd class ever. But I have a feeling there may be more to come. Colleen is a very talented quilter / artist and has designed quite a few quilt patterns. She teaches these classes locally and not-so-locally. You can see some of her patterns at laughinglizzies.com. We're really lucky to have her here in our neck of the woods!
As usual, I learned a lot while making this quilt. I'm not sure I'd use the blue background again, but I already had a lot of this fabric and wanted to use it to save a bit of money. Colleen's patterns certainly are challenging for me as a beginner, but WOW, what an amazing result for my efforts! I really want to do her "salmon Run", but I think I need a quick and easy pattern to do next!
I also need to figure out a border. Her pattern uses a pieced border, which I may attempt, but I'm also thinking about a solid border. Here's a picture of the fabric I have a yard or more of that I'm auditioning. Tell me what you think!
Colleen works at the local quilt shop, Pendleton Quiltworks. I can't wait to show her my (almost) finished quilt!!
Tuesday, September 7, 2010
Thanks
Just wanted to let you know that I wasn't the winner, but did come in 5th place! Thanks to all who voted and rooted for me! I may try the 4th and final challenge as well. I'll keep you posted!
Subscribe to:
Posts (Atom)